今日の写経12
今日の写経
013 UITabBarControllerでタブの表示 - Swift Docs
所感
時間が無いから昨日はやってない!
画面キャプチャ


ソースコード
// AppDelegate.swift
import UIKit

class SecondViewController: UIViewController {

    init() {
        super.init(nibName: nil, bundle: nil)

        // Viewの背景色をGreenに設定する
        self.view.backgroundColor = UIColor.greenColor()

        // tabVarItemのアイコンをFeaturedに、タグを2と定義する
        self.tabBarItem = UITabBarItem(tabBarSystemItem: UITabBarSystemItem.Featured, tag: 2)
    }

    required init(coder aDecoder: NSCoder) {
        super.init(coder: aDecoder)
    }

    required override init(nibName nibNameOrNil: String!, bundle nibBundleOrNil: NSBundle!) {
        super.init(nibName: nibNameOrNil, bundle: nibBundleOrNil)
    }

    override func viewDidLoad() {
        super.viewDidLoad()

        // Do any additional setup after loading the view.
    }

    override func didReceiveMemoryWarning() {
        super.didReceiveMemoryWarning()
        // Dispose of any resources that can be recreated.
    }
}
// FirstViewController.swift
import UIKit

class FirstViewController: UIViewController {

    init() {
        super.init(nibName: nil, bundle: nil)
        self.view.backgroundColor = UIColor.cyanColor()
        self.tabBarItem = UITabBarItem(tabBarSystemItem: UITabBarSystemItem.Featured, tag: 1)
    }

    required init(coder aDecoder: NSCoder) {
        super.init(coder: aDecoder)
    }

    required override init(nibName nibNameOrNil: String!, bundle nibBundleOrNil: NSBundle!) {
        super.init(nibName: nibNameOrNil, bundle: nibBundleOrNil)
    }

    override func viewDidLoad() {
        super.viewDidLoad()

        // Do any additional setup after loading the view.
    }

    override func didReceiveMemoryWarning() {
        super.didReceiveMemoryWarning()
        // Dispose of any resources that can be recreated.
    }

}
// SecondViewController.swift
import UIKit

class SecondViewController: UIViewController {

    init() {
        super.init(nibName: nil, bundle: nil)

        // Viewの背景色をGreenに設定する
        self.view.backgroundColor = UIColor.greenColor()

        // tabVarItemのアイコンをFeaturedに、タグを2と定義する
        self.tabBarItem = UITabBarItem(tabBarSystemItem: UITabBarSystemItem.Featured, tag: 2)
    }

    required init(coder aDecoder: NSCoder) {
        super.init(coder: aDecoder)
    }

    required override init(nibName nibNameOrNil: String!, bundle nibBundleOrNil: NSBundle!) {
        super.init(nibName: nibNameOrNil, bundle: nibBundleOrNil)
    }

    override func viewDidLoad() {
        super.viewDidLoad()

        // Do any additional setup after loading the view.
    }

    override func didReceiveMemoryWarning() {
        super.didReceiveMemoryWarning()
        // Dispose of any resources that can be recreated.
    }
}
今日の写経11
今日の写経
012 UINavigationControllerの表示 - Swift Docs
所感
1個まえでツマズカないとか思ってたら、ちょうど次がNavigationControllerで複数のページ遷移だったので、写経に採用
本を開くのはいつになることやら。
画面キャプチャ

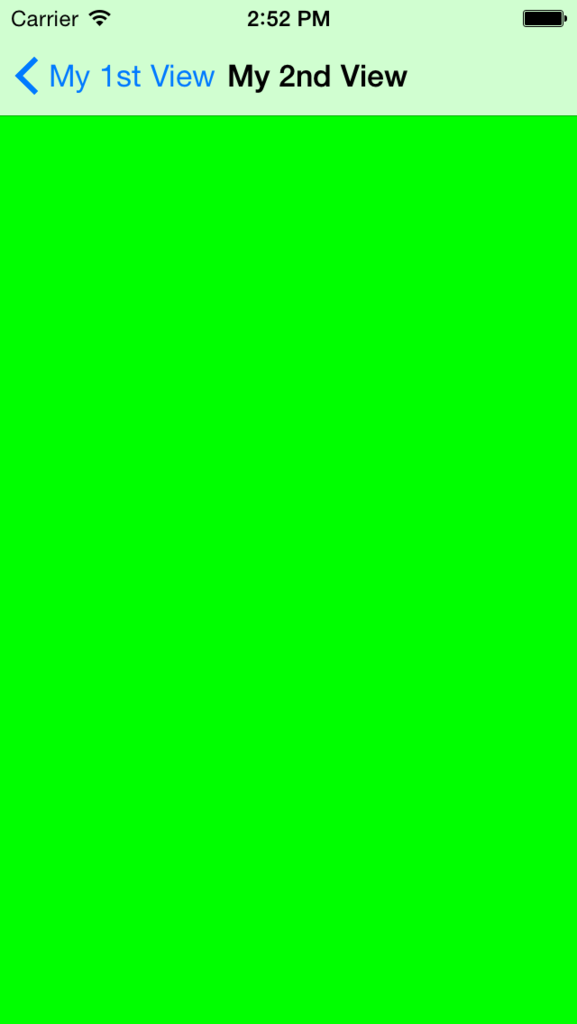
ソースコード
// AppDelegate.swift
import UIKit

@UIApplicationMain
class AppDelegate: UIResponder, UIApplicationDelegate {

    private var window: UIWindow?
    private var myNavigationController: UINavigationController?


    func application(application: UIApplication, didFinishLaunchingWithOptions launchOptions: [NSObject: AnyObject]?) -> Bool {
        // ViewControllerを生成する
        let myFirstViewController: FirstViewController = FirstViewController()

        // Navigation Controllerを生成する
        myNavigationController = UINavigationController(rootViewController: myFirstViewController)

        // UIWindowをせいせうすつ
        self.window = UIWindow(frame: UIScreen.mainScreen().bounds)

        // rootViewControllerにNavigationControllerを設定する
        self.window?.rootViewController = myNavigationController
        self.window?.makeKeyAndVisible()
        return true
    }

    func applicationWillResignActive(application: UIApplication) {
        // Sent when the application is about to move from active to inactive state. This can occur for certain types of temporary interruptions (such as an incoming phone call or SMS message) or when the user quits the application and it begins the transition to the background state.
        // Use this method to pause ongoing tasks, disable timers, and throttle down OpenGL ES frame rates. Games should use this method to pause the game.
    }

    func applicationDidEnterBackground(application: UIApplication) {
        // Use this method to release shared resources, save user data, invalidate timers, and store enough application state information to restore your application to its current state in case it is terminated later.
        // If your application supports background execution, this method is called instead of applicationWillTerminate: when the user quits.
    }

    func applicationWillEnterForeground(application: UIApplication) {
        // Called as part of the transition from the background to the inactive state; here you can undo many of the changes made on entering the background.
    }

    func applicationDidBecomeActive(application: UIApplication) {
        // Restart any tasks that were paused (or not yet started) while the application was inactive. If the application was previously in the background, optionally refresh the user interface.
    }

    func applicationWillTerminate(application: UIApplication) {
        // Called when the application is about to terminate. Save data if appropriate. See also applicationDidEnterBackground:.
    }


}
// FirstViewController.swift
import UIKit

class FirstViewController: UIViewController {

    override func viewDidLoad() {
        super.viewDidLoad()
        // Controllerのタイトルを設定する
        self.title = "My 1st View"

        // Viewの背景色をCyanに設定する
        self.view.backgroundColor = UIColor.cyanColor()

        // ボタンの定義をおこなう
        let myButton = UIButton(frame: CGRectMake(0, 0, 100, 50))
        myButton.backgroundColor = UIColor.orangeColor()
        myButton.layer.masksToBounds = true
        myButton.setTitle("ボタン", forState: .Normal)
        myButton.layer.cornerRadius = 20.0
        myButton.layer.position = CGPoint(x: self.view.bounds.width/2, y: 200)
        myButton.addTarget(self, action: "onClickMyButton:", forControlEvents: .TouchUpInside)

        // ボタンをviewに追加する
        self.view.addSubview(myButton)

    }

    /*
    ボタンイベント
    */
    internal func onClickMyButton(sender: UIButton){
        // 移動先のViewを定義する
        let secondViewController = SecondViewController()
        self.navigationController?.pushViewController(secondViewController, animated: true)
    }
    override func didReceiveMemoryWarning() {
        super.didReceiveMemoryWarning()
        // Dispose of any resources that can be recreated.
    }

}
// SecondViewController.swift
import UIKit

class SecondViewController: UIViewController {

    override func viewDidLoad() {
        super.viewDidLoad()

        // Controllerのタイトルを設定
        self.title = "My 2nd View"
        // Viewの背景色を定義する
        self.view.backgroundColor = UIColor.greenColor()
    }

    override func didReceiveMemoryWarning() {
        super.didReceiveMemoryWarning()
        // Dispose of any resources that can be recreated.
    }

}
Swiftを写経10
今日の写経
010 UIAlertControllerでアラートを表示 - Swift Docs
所感
もうツマヅカない。 次は別の種類にするかも。あと

UIKit&Swiftプログラミング 優れたiPhoneアプリ開発のための UI実装ガイド
- 作者: 斉藤祐輔 JIBUNSTYLE Inc.
- 出版社/メーカー: SBクリエイティブ
- 発売日: 2015/06/17
- メディア: 大型本
- この商品を含むブログを見る
この本を買ったからここから探すかちょっと発展系を探します。
画面キャプチャ

ソースコード
import UIKit

class ViewController: UIViewController, UIPickerViewDelegate, UIPickerViewDataSource {

    // UIPickerView
    private var myUIPicker: UIPickerView!

    // 表示する値の配列
    private let myValues: NSArray = ["その一", "その二", "その三", "その四"]

    override func viewDidLoad() {
        super.viewDidLoad()

        myUIPicker = UIPickerView()

        // サイズを指定する
        myUIPicker.frame = CGRectMake(0, 0, self.view.bounds.width, 180.0)

        // Delefateを設定
        myUIPicker.delegate = self

        // DataSourceを設定
        myUIPicker.dataSource = self

        // viewに追加する
        self.view.addSubview(myUIPicker)
    }

    /*
    pickerに表示する列数を返す
    */
    func numberOfComponentsInPickerView(pickerView: UIPickerView) -> Int {
        return 1
    }

    /*
    pickerに表示する行数を返すデータメソッド
    */
    func pickerView(pickerView: UIPickerView, numberOfRowsInComponent component: Int) -> Int {
        return myValues.count
    }

    /*
    pickerに表示する値を返すデリゲート
    */
    func pickerView(pickerView: UIPickerView, titleForRow row: Int, forComponent component: Int) -> String! {
        return myValues[row] as! String
    }

    /*
    pickerが選択された際に呼ばれるデリゲートメソッド
    */
    func pickerView(pickerView: UIPickerView, didSelectRow row: Int, inComponent component: Int) {
        println("row: \(row)")
        println("value: \(myValues[row])")
    }

    override func didReceiveMemoryWarning() {
        super.didReceiveMemoryWarning()
    }
}
Swiftを写経9
今日の写経
010 UIAlertControllerでアラートを表示 - Swift Docs
所感
今回はスムーズに写経できた。
画面キャプチャ
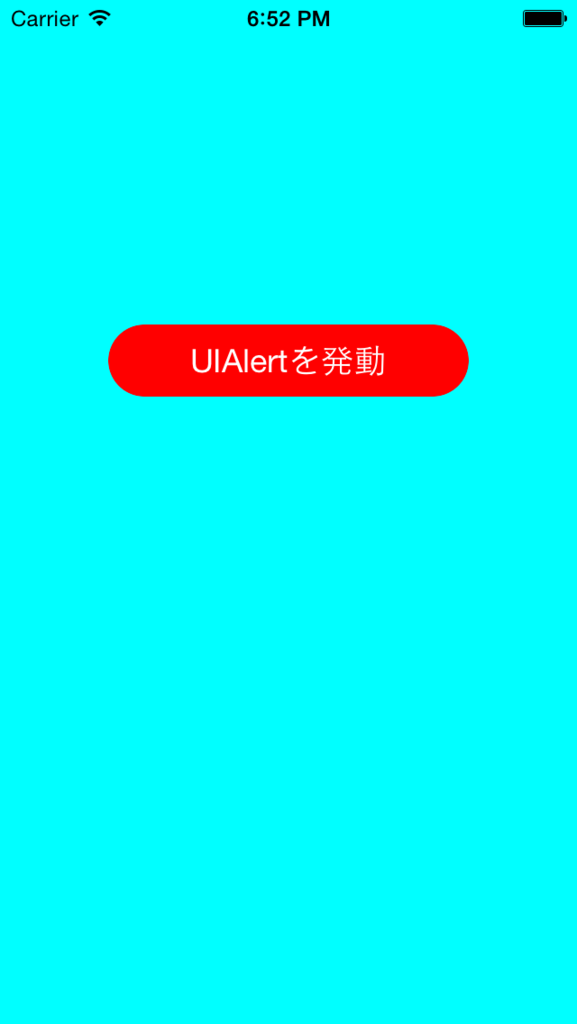
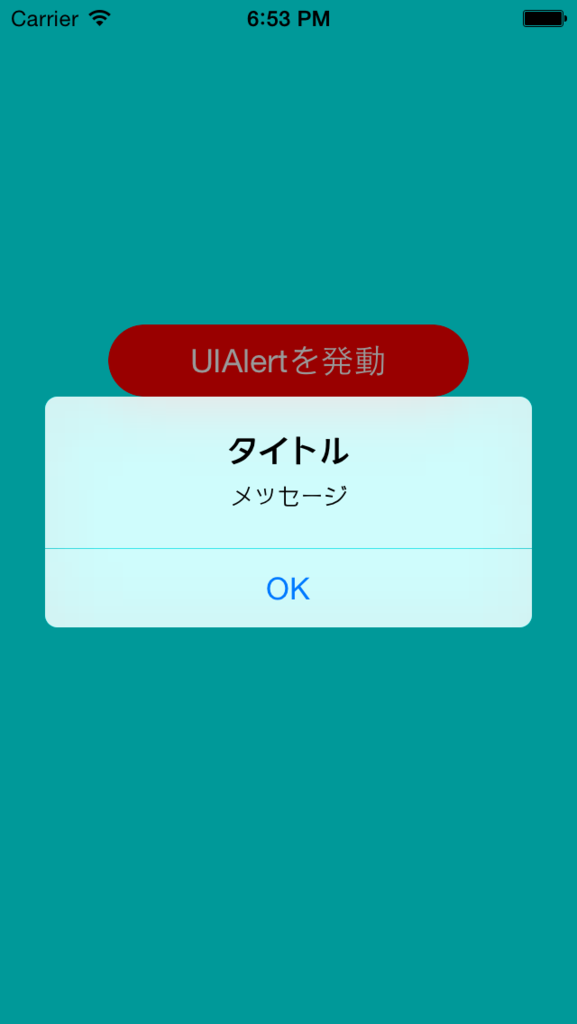
ソースコード
import UIKit

class ViewController: UIViewController {

    override func viewDidLoad() {
        super.viewDidLoad()

        // Viewの背景をCyanに設定する
        self.view.backgroundColor = UIColor.cyanColor()

        // BUttonの定義をする
        let myButton: UIButton = UIButton()
        myButton.frame = CGRectMake(0, 0, 200, 40);
        myButton.backgroundColor = UIColor.redColor()
        myButton.layer.masksToBounds = true
        myButton.setTitle("UIAlertを発動", forState: UIControlState.Normal)
        myButton.setTitleColor(UIColor.whiteColor(), forState: UIControlState.Normal)
        myButton.layer.cornerRadius = 20.0
        myButton.layer.position = CGPoint(x: self.view.frame.width/2, y: 200)
        myButton.addTarget(self, action: "onClickMyButton:", forControlEvents: .TouchUpInside)

        // ボタンをViewに追加する
        self.view.addSubview(myButton)
    }

    /*
    ボタンイベント
    */
    internal func onClickMyButton(sender: UIButton){

        // UIAlertControllerを作成する
        let myAlert: UIAlertController = UIAlertController(title: "タイトル", message: "メッセージ", preferredStyle: .Alert)
        let myOkAction = UIAlertAction(title: "OK", style: .Default) { action in
            println("Action OK!")
        }
        myAlert.addAction(myOkAction)
        presentViewController(myAlert, animated: true, completion: nil)
    }

    override func didReceiveMemoryWarning() {
        super.didReceiveMemoryWarning()
        // Dispose of any resources that can be recreated.
    }


}
Swiftを写経8
今日の写経
009 UIWebViewでページを表示 - Swift Docs
所感
ページは表示されませんでした。
画面キャプチャ
なので、今回はキャプチャなし
ソースコード
import UIKit

class ViewController: UIViewController, UIWebViewDelegate {

    private var myWebView: UIWebView!

    override func viewDidLoad() {
        super.viewDidLoad()

        // WebViewを生成
        myWebView = UIWebView()
        myWebView.delegate = self
        myWebView.frame = self.view.bounds
        self.view.addSubview(myWebView)

        // URLLを設定する
        let url: NSURL = NSURL(string: "http://www.apple.com")!
        let request: NSURLRequest = NSURLRequest(URL: url)
        myWebView.loadRequest(request)
    }

    /*
    Pageがすべて読み込み終わった時呼ばれるデリゲートメソッド
    */
    func webViewDidFinishLoad(webView: UIWebView) {
        println("webViewDidFinishLoaf")
    }
    /*
    Pageがloadされ始めた時、呼ばれるデリゲートメソッド
    */
    func webViewDidStartLoad(webView: UIWebView) {
        println("webViewDidStartLoad")
    }
    override func didReceiveMemoryWarning() {
        super.didReceiveMemoryWarning()
        // Dispose of any resources that can be recreated.
    }


}
Swiftを写経7
今日の写経
008 UILocalNotificationの表示 - Swift Docs
所感
myNotificationFireButton.tag = 2 を書かなかったから時限が起動しなかった。
眠気眼で書いたらいけん。
画面キャプチャ

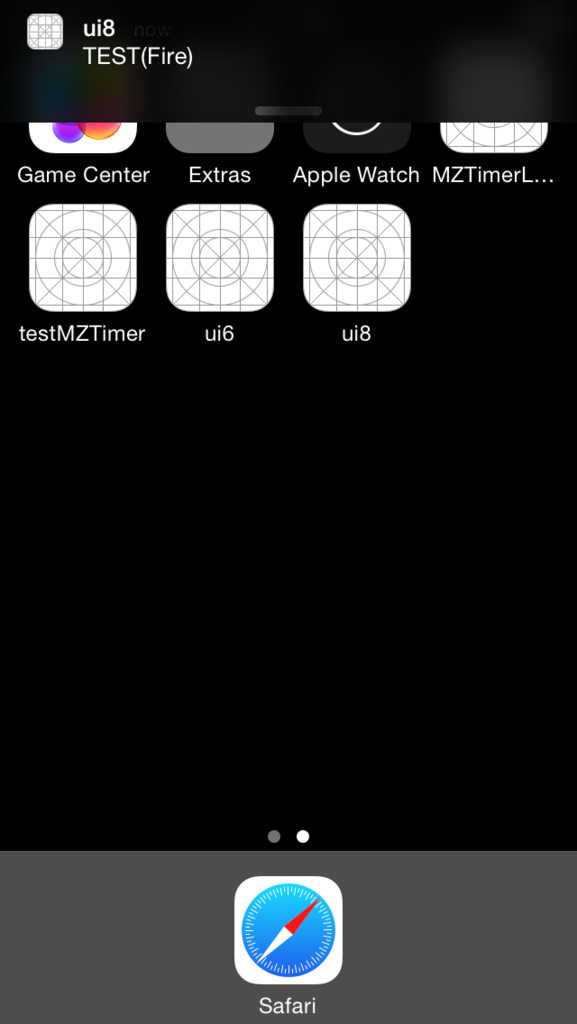
ソースコード
import UIKit

class ViewController: UIViewController {

    override func viewDidLoad() {
        super.viewDidLoad()

        // アラート表示の許可をもらう
        UIApplication.sharedApplication().registerUserNotificationSettings(
            UIUserNotificationSettings(
                forTypes: UIUserNotificationType.Sound | UIUserNotificationType.Alert, categories: nil
            )
        )

        // すぐにNotificationを発火するボタンを作成する
        let myNotificationButton: UIButton = UIButton(frame: CGRectMake(0, 0, 200, 100))
        myNotificationButton.backgroundColor = UIColor.orangeColor()
        myNotificationButton.layer.masksToBounds = true
        myNotificationButton.setTitle("Notification", forState: .Normal)
        myNotificationButton.layer.cornerRadius = 20.0
        myNotificationButton.layer.position = CGPoint(x: self.view.bounds.width/2, y: 200)
        myNotificationButton.addTarget(self, action: "onClickMyButton:", forControlEvents: .TouchUpInside)
        myNotificationButton.tag = 1

        // 時間をおいてNotificationを発火するボタンを作成する
        let myNotificationFireButton: UIButton = UIButton(frame: CGRectMake(0, 0, 200, 80))
        myNotificationFireButton.backgroundColor = UIColor.blueColor()
        myNotificationFireButton.layer.masksToBounds = true
        myNotificationFireButton.setTitle("Notification(Fire)", forState: .Normal)
        myNotificationFireButton.layer.cornerRadius = 20.0
        myNotificationFireButton.layer.position = CGPoint(x: self.view.bounds.width/2, y: 400)
        myNotificationFireButton.addTarget(self, action: "onClickMyButton:", forControlEvents: .TouchUpInside)
        myNotificationFireButton.tag = 2

        //ViewにButtonを追加する
        view.addSubview(myNotificationButton)
        view.addSubview(myNotificationFireButton)
    }

    /*
    ボタンイベント
    */
    internal func onClickMyButton(sender: UIButton){
        println("onClickMyButton")
        if sender.tag == 1 {
            showNotification()
        } else if sender.tag == 2 {
            showNotificationFire()
        }
    }

    /*
    Show Notification
    */
    private func showNotification(){
        println("showNotification")

        // Notificationを生成する
        let myNotification: UILocalNotification = UILocalNotification()
        myNotification.alertBody = "TEST"
        myNotification.timeZone = NSTimeZone.defaultTimeZone()
        UIApplication.sharedApplication().scheduleLocalNotification(myNotification)
    }

    /*
    Show Notificatiion(10 sec後に発火)
    */
    private func showNotificationFire(){
        println("shoNotificationFire")

        // Notificationを生成する
        let myNotification: UILocalNotification = UILocalNotification()
        myNotification.alertBody = "TEST(Fire)"
        myNotification.soundName = UILocalNotificationDefaultSoundName
        myNotification.timeZone = NSTimeZone.defaultTimeZone()
        myNotification.fireDate = NSDate(timeIntervalSinceNow: 10)
        UIApplication.sharedApplication().scheduleLocalNotification(myNotification)
    }

    override func didReceiveMemoryWarning() {
        super.didReceiveMemoryWarning()
        // Dispose of any resources that can be recreated.
    }


}
Swiftを写経6
とりあえず
シミュレータのキャプチャと書いたソースを乗せることにします。
ただ写経してるだけなので差は無いはず。
今日の写経
所感
特に無し
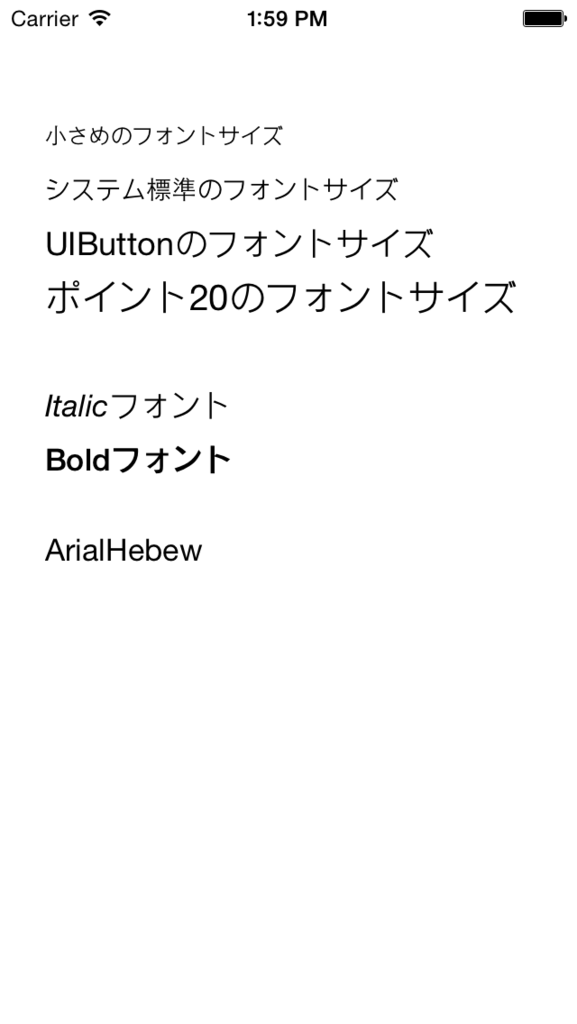
画面キャプチャ
ソースコード
import UIKit

class ViewController: UIViewController {

    override func viewDidLoad() {
        super.viewDidLoad()

        // 小さめのフォントの文字列をラベルに表示する
        let mySmallLabel: UILabel = UILabel()
        mySmallLabel.font = UIFont.systemFontOfSize(UIFont.smallSystemFontSize())
        mySmallLabel.text = "小さめのフォントサイズ"
        mySmallLabel.frame = CGRect(x: 25, y: 0, width: 300, height: 150)
        self.view.addSubview(mySmallLabel)

        // システム標準のフォントサイズの文字列をラベルに表示する
        let myNormalLabel: UILabel = UILabel()
        myNormalLabel.font = UIFont.systemFontOfSize(UIFont.systemFontSize())
        myNormalLabel.text = "システム標準のフォントサイズ"
        myNormalLabel.frame = CGRect(x: 25, y: 30, width: 200, height: 150)
        self.view.addSubview(myNormalLabel)

        // UIButton用のフォントサイズの文字列をラベルに表示する
        let myButtonLabel: UILabel = UILabel()
        myButtonLabel.font = UIFont.systemFontOfSize(UIFont.buttonFontSize())
        myButtonLabel.text = "UIButtonのフォントサイズ"
        myButtonLabel.frame = CGRect(x: 25, y: 60, width: 300, height: 150)
        self.view.addSubview(myButtonLabel)

        // カスタムしたフォントサイズ(20)の文字列を食べるに表示する
        let myCustomLabel: UILabel = UILabel()
        myCustomLabel.font = UIFont.systemFontOfSize(CGFloat(20))
        myCustomLabel.text = "ポイント20のフォントサイズ"
        myCustomLabel.frame = CGRect(x: 25, y: 90, width: 300, height: 150)
        self.view.addSubview(myCustomLabel)

        // Italic SystemFontの文字列をラベルに表示する
        let myItalicLabel: UILabel = UILabel()
        myItalicLabel.font = UIFont.italicSystemFontOfSize(UIFont.labelFontSize())
        myItalicLabel.text = "Italicフォント"
        myItalicLabel.frame = CGRect(x: 25, y: 150, width: 300, height: 150)
        self.view.addSubview(myItalicLabel)

        // Boldの文字列をラベルに表示する
        let myBoldlabel: UILabel = UILabel()
        myBoldlabel.font = UIFont.boldSystemFontOfSize(UIFont.labelFontSize())
        myBoldlabel.text = "Boldフォント"
        myBoldlabel.frame = CGRect(x: 25, y: 180, width: 300, height: 150)
        self.view.addSubview(myBoldlabel)

        let myAlialLabel: UILabel = UILabel()
        myAlialLabel.font = UIFont(name: "ArialHebew", size: UIFont.labelFontSize())
        myAlialLabel.text = "ArialHebew"
        myAlialLabel.frame = CGRect(x: 25, y: 230, width: 300, height: 150)
        self.view.addSubview(myAlialLabel)

    }

    override func didReceiveMemoryWarning() {
        super.didReceiveMemoryWarning()
        // Dispose of any resources that can be recreated.
    }
}